台風 HIL XIL API Python ガイド
Python環境でテストを作成するためにASAM XIL APIを使い始める方法
XIL API .NETアセンブリのインポート
import sys import clr import os import typhoon.api.hil as hil ASSEMBLY_NAME = 'ASAM.XIL.Implementation.Testbench' SERVER_CLASS_NAME = 'TyphoonHIL.ASAM.XIL.Server' # ASSEMBLY_ROOT パスの TyphoonHIL SW バージョンとシステム ドライブ ラベルを取得します sw_ver = hil.get_sw_version() system_drive = os.getenv("SystemDrive") ASSEMBLY_ROOT = r'{}\ProgramData\ASAM\XIL\Typhoon HIL Control Center {}' \ r'\XILVersion_2.1.0\C#'.format(system_drive, sw_ver) sys.path.append(str(ASSEMBLY_ROOT)) # XIL API .NET アセンブリへの参照を追加します clr.AddReference(ASSEMBLY_NAME) clr.AddReference(サーバークラス名)Typhoon HIL XIL API テストベンチの作成
すべてのXIL APIインターフェースは、ファクトリーメソッドを介して作成できます。ファクトリーアプローチは、テストケースとテストシステムの独立性を最大限に高めるために適用されます。テストベンチAPIは、テストハードウェアとテストソフトウェアを分離し、ハードウェアへの標準化されたアクセスを可能にします。
TyphoonHIL.ASAM.XIL.Serverをサーバーとしてインポートします。testbench = server.Testbench() print('テストベンチが呼び出されました') MA(モデルアクセス)ポートの作成と構成
テストベンチAPIは、モデルアクセスハードウェアへのアクセスをカバーします。モデルアクセスは、シミュレーションモデルの読み取りおよび書き込みパラメータ、キャプチャ機能、生成された信号へのアクセスを提供します。
MAPort インスタンスに構成を読み込んで適用するには、LoadConfiguration メソッドと Configure メソッドを使用します。
pathlib から os をインポートします。 Path をインポートします。 typhoon.api.hil を hil としてインポートします。 typhoon.api.schematic_editor から model をインポートします。 FILE_DIR_PATH = Path(__file__).parent model_name = "test_model.tse" model_path = os.path.join(FILE_DIR_PATH, "hil_model", model_name) compiled_model_path = model.get_compiled_model_file(model_path) model.load(model_path) model.compile() hil.load_model(compiled_model_path, vhil_device=vhil_enable)# script directory
TEST_DIR_PATH = Path(__file__).parent
MODEL_FILE_NAME = "test_model.tse"
MODEL_FILE_PATH = os.path.join(TEST_DIR_PATH, "hil_model", MODEL_FILE_NAME)
# Example of XML file
xml_content = f"""<?xml version='1.0'?>
<root>
<schematic_path>{MODEL_FILE_PATH}</schematic_path>
<vhil_device>false</vhil_device>
<debug>true</debug>
</root>"""
XML_FILE_NAME = "ModelInfo_HIL.xml"
MA_PORT_CONFIG = os.path.join(TEST_DIR_PATH, "hil_model", XML_FILE_NAME)
# Invoke Testbench
testbench = server.Testbench()
# Create MA Port
maPort = testbench.MAPortFactory.CreateMAPort('ECU-TEST MA-Port')
# Create configuration file – because we want to use a relative MODEL_FILE_PATH
with open(MA_PORT_CONFIG, 'w') as xml_f:
xml_f.write(xml_content)
# Load configuration
cfg = maPort.LoadConfiguration(str(MA_PORT_CONFIG))
# Apply to the MA Port
maPort.Configure(cfg, False)テストケースとテストシステムの独立性を最大限に高めるには、テストシステムのインターフェースを標準化するだけでは不十分です。XIL実装を提供するあらゆるベンダーから、対応するインスタンスを取得できる汎用的な方法が必要です。そこで、ファクトリーアプローチを採用します。つまり、インスタンスは既存のオブジェクトのメソッドから取得されます。
MA ポート - 変数の読み取りと書き込み
図1のシーケンス図は、モデル変数の取り扱いとアクセス方法を示しています。XILシミュレータは既に初期化されており、シミュレーションモデルが実行中であると仮定しています。MAPortインスタンスは、利用可能なすべてのモデル変数を収集し、それらがシミュレーションモデル内に存在するかどうかを確認するために使用されます。モデル変数にアクセスする前に、MAPortインスタンスを介して、変数のデータ型と読み取り/書き込み可能かどうかを確認できます。変数には、MAPortオブジェクトのRead()メソッドとWrite()メソッドを使用してアクセスできます。
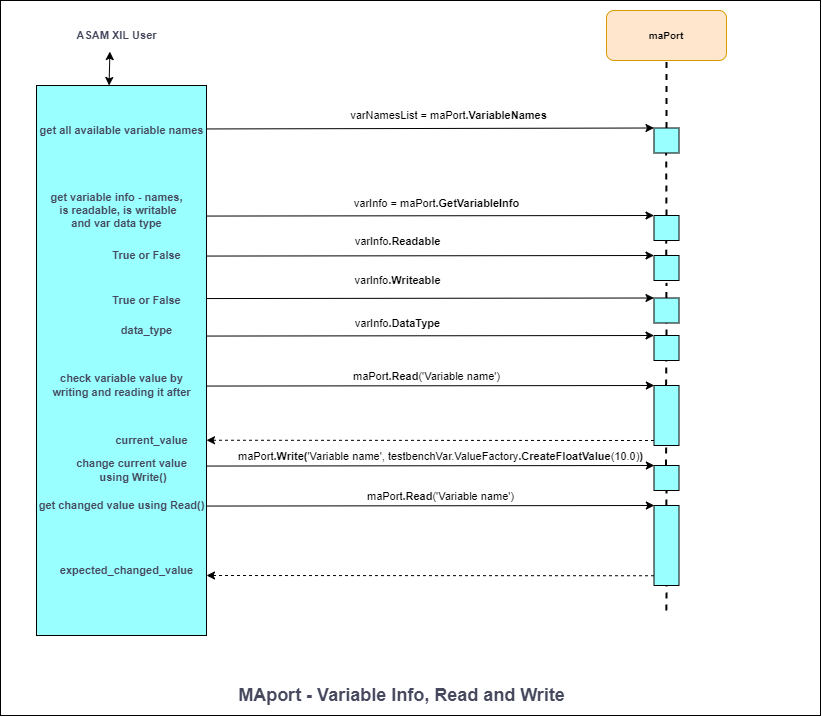
# モデルはプローブに接続された SCADA 入力です setVal = 10.0 # 変数が読み取り可能かどうかを確認します - True または False を返します canRead = maPort.IsReadable('SCADA Input1') # 変数が書き込み可能かどうかを確認します - True または False を返します canWrite = maPort.IsWritable('SCADA Input1') # 変数のデータ型を取得します varDataType = maPort.GetDataType('SCADA Input1') # SCADA 入力に値を書き込みます maPort.Write('SCADA Input1', testbenchVar.ValueFactory.CreateFloatValue(setVal)) # プローブから値を読み取ります raw_probeExp = maPort.Read('Probe1') probeExp = raw_probeExp.__raw_implementation__ print(str(probeExp.Value))MA ポート - シミュレーションの開始 / 停止とシミュレーション状態
# Start simulation – simulation can be started from MAport states:
# eDISCONNECTED or eSIMULATION_STOPPED
maPort.StartSimulation()
# The current MAport state after starting simulation is eSIMULATION_RUNNING

# Run some tests
#      .
#      .
#      .

# Stop simulation – simulation can be stopped from MAport states:
# eSIMULATION_RUNNING
maPort.StopSimulation()
# The current MAport state after stopping simulation is eSIMULATION_STOPPED

# Disconnect from MAPort – simulation will be stopped, if not before
# Can be called from MAport states: eSIMULATION_RUNNING or eSIMULATION_STOPPED
maPort.Disconnect()
# The current MAport state after disconnecting from MAport is eDISCONNECTED

# The MAport State can be checked in the following way
currentState = maPort.State
print(“The current MAport state is: {}”.format(currentState))

maPort.Dispose()
print("MAPort DISPOSED")maPortState = {
# A connection to the port's hardware is established. Model simulation
# is not running (stopped).
0x0000: "eSIMULATION_STOPPED",
# A connection to the port's hardware is established. Model simulation
# is running.
0x0001: "eSIMULATION_RUNNING",
# A connection to the port's hardware is not established.
0x0002: "eDISCONNECTED",
}
# You can check the state of simulation by:
currentState = maPort.State
assert maPortState[currentState] == "eSIMULATION_RUNNING", "The MA Port" \
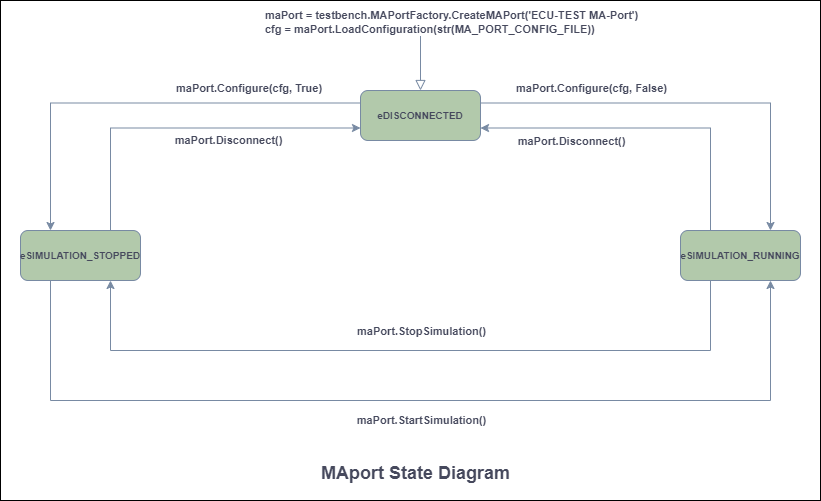
"state is not in eSIMULATION_RUNNING state."MAportの状態図を図2に示します。ここでは、どのメソッドがどの状態から呼び出せるかを確認できます。
モデルに含まれる変数を確認する場合は、 VariableNamesプロパティを使用できます。
# 変数名のリストからすべての変数名を取得します。raw_varNamesList = maPort.VariableNames varNamesList = raw_varNamesList.__raw_implementation__ # モデルからのすべての変数名のリスト for variable in varNamesList: print(str(variable))または、 TaskNamesプロパティを使用してすべてのタスク名のリストを表示します。
# タスク名のリストからすべてのタスク名を取得します。raw_taskNames = maPort.TaskNames taskNames = raw_taskNames.__raw_implementation__ # サポートされているタスクの利用可能なリストからすべてのタスク名のリストを取得します。for task in taskNames: print(str(task))キャプチャ - キャプチャの作成、開始、停止、キャプチャ状態
連続データストリームからデータを取得するプロセスは、キャプチャリングと呼ばれます。このプロセスは、キャプチャサービスタスクにおいて、リアルタイムサービスに関連するすべてのプロセスデータが、発生した時点で取得できることを保証します。このプロセスが完了した後、あるいは進行中であっても、取得したデータを取得できます。
キャプチャの実行制御、および測定データの取得と表示を司るクラスは、Common.Capturing パッケージからアクセスできます。これらのクラスは、 MAPortインスタンスによって使用されます。
CaptureクラスはCapturingパッケージのメインクラスです。コントロールキャプチャの実行を定義するために使用されます。
プローブ信号をキャプチャする場合は、信号ストリーミングを設定する必要があります。信号ストリーミングプロパティを有効にすると、信号の取得とログ記録が可能になります。Captureクラスのインスタンスは、キャプチャ定義を表します。キャプチャは、キャプチャを定義するポート(この場合はMAPort )によって作成されます。
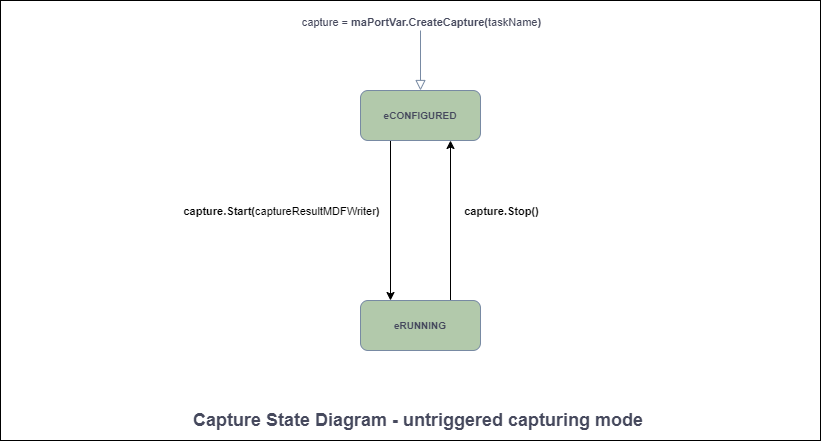
# キャプチャ オブジェクトを作成して初期化しますtaskName = "Capturing_Probe" capture = maPort.CreateCapture(taskName) # 現在のキャプチャ状態を取得します ("eCONFIGURED" である必要があります) currentCaptureState = capture.State # キャプチャの変数を設定しますprobeOutputLst = ["Probe1", "Subsystem1.Probe1"] capture.Variables = Array[str](probeOutputLst) # CaptureResultMDFWriter オブジェクトを作成しますcaptureResultMDFWriter = testbenchVar.CapturingFactory.CreateCaptureResultMDFWriterByFileName(file_path) # キャプチャ プロセス – キャプチャを開始しますcapture.Start(captureResultMDFWriter) # 現在のキャプチャ状態を取得します ("eRUNNING" である必要があります) currentCaptureState = capture.State # キャプチャ プロセス – キャプチャ プロセスを明示的に停止するには、Stop を呼び出す必要がありますcapture.Stop()キャプチャオブジェクトは、データ取得の状態を表す状態を持ちます。これは、キャプチャオブジェクトの state プロパティを介して取得できます。
file_path – MDF ファイルへのパス。
トリガーされていないキャプチャ モードの状態図を図 3に示します。
信号セグメント - 刺激信号の作成
# Create Const segment
raw_constSegment = testbench.SignalFactory.CreateConstSegment()
constSegment = raw_constSegment.__raw_implementation__
# Set Const segment properties
constSegment.Duration = testbench.SymbolFactory.CreateConstSymbolByValue(3.4)
constSegment.Value = testbench.SymbolFactory.CreateConstSymbolByValue(5)
# Get the Segment Type (Should be “eCONST”)
segmentTyp = constSegment.Type
# Get the Duration value
print("Duration of segment is: " + str(constSegment.Duration.Value))
# Get the Segment Value
raw_const_segment_value = constSegment.Value
const_segment_value = raw_const_segment_value.__raw_implementation__
print("Value of Const segment is: " + str(const_segment_value.Value))

# Create Exponential segment
expSegment = testbenchVar.SignalFactory.CreateExpSegment()
# Set Exponential segment properties
expSegment.Duration = testbenchVar.SymbolFactory.CreateConstSymbolByValue(5)
expSegment.Start = testbenchVar.SymbolFactory.CreateConstSymbolByValue(1)
expSegment.Stop = testbenchVar.SymbolFactory.CreateConstSymbolByValue(4)
expSegment.Tau = testbenchVar.SymbolFactory.CreateConstSymbolByValue(0.63)
# Get the Segment Type (Should be “eEXP”)
segmentTyp = expSegment.Type
# Get the Duration value
print("Duration of Exp segment is: " + str(exp_segment.Duration.Value))
# Get the Start value
raw_exp_segment_start = expSegment.Start
exp_segment_start = raw_exp_segment_start.__raw_implementation__
print("Start value of Exp segment is: " + str(exp_segment_start.Value)
# Get the Stop value
raw_exp_segment_stop = expSegment.Stop
exp_segment_stop = raw_exp_segment_stop.__raw_implementation__
print("Stop after: " + str(exp_segment_stop.Value))
# Get the Tau value
raw_exp_segment_tau = expSegment.Tau
exp_segment_tau = raw_exp_segment_tau.__raw_implementation__
print("Value of Tau is: " + str(exp_segment_tau.Value))

# Create Ramp segment
rampSegment = testbenchVar.SignalFactory.CreateRampSegment()
# Set Ramp segment properties
rampSegment.Duration = testbenchVar.SymbolFactory.CreateConstSymbolByValue(5)
rampSegment.Start = testbenchVar.SymbolFactory.CreateConstSymbolByValue(1)
rampSegment.Stop = testbenchVar.SymbolFactory.CreateConstSymbolByValue(6)
# Get the Segment Type (Should be “eRAMP”)
segmentTyp = rampSegment.Type
# Get the Duration value
print("Duration of Ramp segment is: " + str(ramp_segment.Duration.Value))
# Get the Start value
raw_ramp_segment_start = rampSegment.Start
ramp_segment_start = raw_ramp_segment_start.__raw_implementation__
print("Start value of Ramp segment is: " + str(ramp_segment_start.Value))
# Get the Stop value
raw_ramp_segment_stop = rampSegment.Stop
ramp_segment_stop = raw_ramp_segment_stop.__raw_implementation__
print("Value of Ramp segment is: " + str(ramp_segment_stop.Value))

# Create RampSlope segment
rampSlopeSegment = testbenchVar.SignalFactory.CreateRampSlopeSegment()
# Set RampSlope segment properties
rampSlopeSegment.Duration = testbenchVar.SymbolFactory.CreateConstSymbolByValue(5)
rampSlopeSegment.Offset = testbenchVar.SymbolFactory.CreateConstSymbolByValue(1)
rampSlopeSegment.Slope = testbenchVar.SymbolFactory.CreateConstSymbolByValue(5)
# Get the Segment Type (Should be “eRAMPSLOPE”)
segmentTyp = rampSlopeSegment.Type
# Get the Duration value
print("Duration of RampSlope segment is: " + str(rampSlopeSegment.Duration.Value))
# Get the Offset value
raw_rampSlopeSegment_offset = rampSlopeSegment.Offset
rampSlopeSegment_offset = raw_rampSlopeSegment_offset.__raw_implementation__
print("Offset value of RampSlope segment is: " + str(rampSlopeSegment_offset.Value))
# Get the Slope value
raw_rampSlopeSegment_slope = rampSlopeSegment.Slope
rampSlopeSegment_slope = raw_rampSlopeSegment_slope.__raw_implementation__
print("Value of RampSlope segment is: " + str(rampSlopeSegment_slope.Value))

# Create Sine segment
sineSegment = testbenchVar.SignalFactory.CreateSineSegment()
# Set Sine segment properties
sineSegment.Amplitude = testbenchVar.SymbolFactory.CreateConstSymbolByValue(10)
sineSegment.Duration = testbenchVar.SymbolFactory.CreateConstSymbolByValue(5)
sineSegment.Offset = testbenchVar.SymbolFactory.CreateConstSymbolByValue(1)
sineSegment.Period = testbenchVar.SymbolFactory.CreateConstSymbolByValue(0.25)
sineSegment.Phase = testbenchVar.SymbolFactory.CreateConstSymbolByValue(3)
# Get the Segment Type (Should be “eSINE”)
segmentTyp = sineSegment.Type
# Get the Amplitude value
raw_sineSegment_amplitude = sineSegment.Amplitude
sineSegment_amplitude = raw_sineSegment_amplitude.__raw_implementation__
print("Amplitude of Sine segment is: " + str(sineSegment_amplitude.Value))
# Get the Duration value
print("Duration of Sine segment is: " + str(sineSegment.Duration.Value))
# Get the Offset value
raw_sineSegment_offset = sineSegment.Offset
sineSegment_offset = raw_sineSegment_offset.__raw_implementation__
print("Offset value of Sine segment is: " + str(sineSegment_offset.Value))
# Get the Period value
raw_sineSegment_period = sineSegment.Period
sineSegment_period = raw_sineSegment_period.__raw_implementation__
print("Value of Sine segment is: " + str(sineSegment_period.Value))
# Get the Phase value
raw_sineSegment_phase = sineSegment.Phase
sineSegment_phase = raw_sineSegment_phase.__raw_implementation__
print("Value of Sine segment is: " + str(sineSegment_phase.Value))

# Create Noise segment
noiseSegment = testbenchVar.SignalFactory.CreateNoiseSegment()
# Set Noise segment properties
noiseSegment.Duration = testbenchVar.SymbolFactory.CreateConstSymbolByValue(10)
noiseSegment.Mean = testbenchVar.SymbolFactory.CreateConstSymbolByValue(5)
noiseSegment.Sigma = testbenchVar.SymbolFactory.CreateConstSymbolByValue(1)
noiseSegment.Seed = testbenchVar.SymbolFactory.CreateConstSymbolByValue(4)
# Get the Segment Type (Should be “eNOISE”)
segmentTyp = noiseSegment.Type
# Get the Duration value
print("Duration of segment is: " + str(noiseSegment.Duration.Value))
# Get the Mean value
raw_noiseSegment_mean = noiseSegment.Mean
noiseSegment_mean = raw_noiseSegment_mean.__raw_implementation__
print("Mean of Noise segment is: " + str(noiseSegment_mean.Value))
# Get the Seed value
raw_noiseSegment_seed = noiseSegment.Seed
noiseSegment_seed = raw_noiseSegment_seed.__raw_implementation__
print("Seed of Noise segment is: " + str(noiseSegment_seed.Value))
# Get the Sigma value
raw_noiseSegment_sigma = noiseSegment.Sigma
noiseSegment_sigma = raw_noiseSegment_sigma.__raw_implementation__
print("Sigma of Noise segment is: " + str(noiseSegment_sigma.Value))

# Create Saw segment
sawSegment = testbenchVar.SignalFactory.CreateSawSegment()
# Set Saw segment properties
sawSegment.Duration = testbenchVar.SymbolFactory.CreateConstSymbolByValue(10)
sawSegment.Offset = testbenchVar.SymbolFactory.CreateConstSymbolByValue(5)
sawSegment.Period = testbenchVar.SymbolFactory.CreateConstSymbolByValue(1)
sawSegment.Amplitude = testbenchVar.SymbolFactory.CreateConstSymbolByValue(4)
sawSegment.Phase = testbenchVar.SymbolFactory.CreateConstSymbolByValue(0)
sawSegment.DutyCycle = testbenchVar.SymbolFactory.CreateConstSymbolByValue(1)
# Get the Segment Type (Should be “eNOISE”)
segmentTyp = sawSegment.Type
# Get the Duration value
print("Duration of segment is: " + str(sawSegment.Duration.Value))
# Get the Offset value
raw_sawSegment_offset = sawSegment.Offset
sawSegment_offset = raw_sawSegment_offset.__raw_implementation__
print("Offset of Saw segment is: " + str(sawSegment_offset.Value))
# Get the Period value
raw_sawSegment_period = sawSegment.Period
sawSegment_period = raw_sawSegment_period.__raw_implementation__
print("Period of Saw segment is: " + str(sawSegment_period.Value))
# Get the Amplitude value
raw_sawSegment_amplitude = sawSegment.Amplitude
sawSegment_amplitude = raw_sawSegment_amplitude.__raw_implementation__
print("Amplitude of Saw segment is: " + str(sawSegment_amplitude.Value))
# Get the Phase value
raw_sawSegment_phase = sawSegment.Phase
sawSegment_phase = raw_sawSegment_phase.__raw_implementation__
print("Phase of Saw segment is: " + str(sawSegment_phase.Value))
# Get the DutyCycle value
raw_sawSegment_dutycycle = sawSegment.DutyCycle
sawSegment_dutycycle = raw_sawSegment_dutycycle.__raw_implementation__
print("DutyCycle of Saw segment is: " + str(sawSegment_dutycycle.Value))

# Create Pulse segment
pulseSegment = testbenchVar.SignalFactory.CreatePulseSegment()
# Set Pulse segment properties
pulseSegment.Duration = testbenchVar.SymbolFactory.CreateConstSymbolByValue(10)
pulseSegment.Offset = testbenchVar.SymbolFactory.CreateConstSymbolByValue(5)
pulseSegment.Period = testbenchVar.SymbolFactory.CreateConstSymbolByValue(1)
pulseSegment.Amplitude = testbenchVar.SymbolFactory.CreateConstSymbolByValue(4)
pulseSegment.Phase = testbenchVar.SymbolFactory.CreateConstSymbolByValue(0)
pulseSegment.DutyCycle = testbenchVar.SymbolFactory.CreateConstSymbolByValue(1)
# Get the Segment Type (Should be “eNOISE”)
segmentTyp = pulseSegment.Type
# Get the Offset value
raw_pulseSegment_offset = pulseSegment.Offset
pulseSegment_offset = raw_pulseSegment_offset.__raw_implementation__
print("Offset of Pulse segment is: " + str(pulseSegment_offset.Value))
# Get the Period value
raw_pulseSegment_period = pulseSegment.Period
pulseSegment_period = raw_pulseSegment_period.__raw_implementation__
print("Period of Pulse segment is: " + str(pulseSegment_period.Value))
# Get the Phase value
raw_pulseSegment_phase = pulseSegment.Phase
pulseSegment_phase = raw_pulseSegment_phase.__raw_implementation__
print("Phase of Pulse segment is: " + str(pulseSegment_phase.Value))
# Get the DutyCycle value
raw_pulseSegment_dutycycle = pulseSegment.DutyCycle
pulseSegment_dutycycle = raw_pulseSegment_dutycycle.__raw_implementation__
print("DutyCycle of Pulse segment is: " + str(pulseSegment_dutycycle.Value))

# Operation signal segment
from ASAM.XIL.Interfaces.Testbench.Common.Signal.Enum import OperationTypes
# Create Operation segment
operationSegment = testbench_var.SignalFactory.CreateOperationSegment()
# enum OperationTypes
#     eADD = 0,
#     eMULT = 1
operationSegment.Operation = OperationTypes(0)
print("The operation is : " + str(operationSegment.Operation))
# ******************* Set the values for Left segment ****************************************************
# Create Left segment
operationSegment.LeftSegment = testbench_var.SignalFactory.CreateRampSegment()
raw_operationSegment_left = operationSegment.LeftSegment
operationSegment_left = raw_operationSegment_left.__raw_implementation__
print("The type of LeftSegment is: " + str(type(operationSegment_left)))
# Set the value for Duration of Left segment (Ramp) and check it
operationSegment_left.Duration = (testbench_var.SymbolFactory.CreateConstSymbolByValue(5.0))
print("Duration of segment is: " + str(operationSegment_left.Duration.Value))
# Set the Start value of Left segment (Ramp) and check it
operationSegment_left.Start = testbench_var.SymbolFactory.CreateConstSymbolByValue(0.0)
raw_operationSegment_left_start = operationSegment_left.Start
operationSegment_left_start = raw_operationSegment_left_start.__raw_implementation__
print("Start value of Ramp segment is: " + str(operationSegment_left_start.Value))
# Set the Stop value of Left segment (Ramp) and check it
operationSegment_left.Stop = testbench_var.SymbolFactory.CreateConstSymbolByValue(5.0)
raw_operationSegment_left_stop = operationSegment_left.Stop
perationSegment_left_stop = raw_operationSegment_left_stop.__raw_implementation__
print("Value of Ramp segment is: " + str(operationSegment_left_stop.Value))
# Get the Segment Type and check it
segment_typ = operationSegment_left.Type
print("Type of segment is: " + str(segment_typ))
# ******************* Set the values for Right segment ****************************************************
# Create Left segment
operationSegment.RightSegment = testbench_var.SignalFactory.CreateConstSegment()
raw_operationSegment_right = operationSegment.RightSegment
operationSegment_right = raw_operationSegment_right.__raw_implementation__
print("The type of RightSegment is: " + str(type(operationSegment_right)))
# Set the value for Duration of Right segment (Const)
operationSegment_right.Duration = (testbench_var.SymbolFactory.CreateConstSymbolByValue(5.0))
raw_operationSegment_right_duration = operationSegment_right.Duration
operationSegment_right_duration = (raw_operationSegment_right_duration.__raw_implementation__)
print("Duration of segment is: " + str(operationSegment_right_duration.Value))
# Set the Value of Const segment
operationSegment_right.Value = testbench_var.SymbolFactory.CreateConstSymbolByValue(5.0)
raw_operationSegment_right_value = operationSegment_right.Value
operationSegment_right_value = (raw_operationSegment_right_value.__raw_implementation__)
print("Value of Const segment is: " + str(operationSegment_right_value.Value))
# Get the Segment Type
segment_typ = operationSegment_right.Type
print("Type of segment is: " + str(segment_typ))SignalValue信号セグメントを作成する場合は、Typhoon HIL でサードパーティのツールを使用するか、 .STIファイルからセグメントを読み込んで手動で作成する必要があります。
シグナル記述ファイルは、SignalDescriptionSet型のオブジェクト、さらにはSignalGenerator型のオブジェクトをシリアル化するために使用します。シグナル記述ファイルは、ファイル拡張子がSTIであるXMLファイルです。
刺激信号の生成
刺激に信号を用いるには、信号発生器を使用します。信号発生器は、信号をモデル変数に関連付け、信号生成プロセスを制御します。
channels_list = [(["SampleSignal1"]), (["SampleSignal2"]), (["SampleSignal3"])] # STI ファイルから信号を読み取りますstiReader = testbench.SignalGeneratorFactory. CreateSignalGeneratorSTIReaderByFileName (STI_FILE_PATH) # 信号ジェネレーターを作成しますsignalGenerator = maPort.CreateSignalGenerator () # STI ファイルから信号をロードしますsignalGenerator. Load (stiReader) # SigGen の状態を確認します – eIN_CONFIGURATION である必要がありますsigGenState = signalGenerator. State # 信号 (SampleSignal1) をモデル変数に割り当てますmodelVarName1 = "SCADA Input1" assignmentsDict = Dictionary[str, str]() assignmentsDict[channels_list[0]] = modelVarName1 # 信号の説明とモデル変数のマッピングを設定しますsignalGenerator. Assignments = assignmentsDict # Typhoon HIL デバイスに信号をロードします - eREADY 状態に切り替えますsignalGenerator. LoadToTarget () # 信号ジェネレータを起動します - eRUNNING 状態に切り替えますsignalGenerator. Start () # 計測をいくつか行います - 信号をキャプチャします # . # . # . # 信号の終了前に信号ジェネレータを一時停止します - ePAUSED 状態に切り替えますsignalGenerator. Pause () # 信号を変更するなど、いくつか変更を加えます # . # . # . # 信号ジェネレータを起動します - eRUNNING 状態に切り替えますsignalGenerator. Start () # 信号ジェネレータを停止します - eSTOPPED 状態に切り替えますsignalGenerator. Stop ()SignalGeneratorは刺激を定義し、その実行を管理します。刺激の定義には、SignalGeneratorからSignalDescriptionSetが参照されます。SignalDescriptionSetの信号は、「Assignments」コレクション内のモデル変数に割り当てられます。刺激を管理するために、刺激をターゲットシステムにダウンロードし、開始、停止、一時停止し、現在の状態を監視する機能が提供されます。
<?xml version="1.0" encoding="utf-8"?>
<SignalDescriptionFile xmlns="http://www.asam.net/XIL/Signal/2.2.0" xmlns:xsi="http://www.w3.org/2001/XMLSchema-instance" xsi:schemaLocation="http://www.asam.net/XIL/Signal/2.2.0 ../SignalDescriptionFormat.xsd">
	<!-- Signal generator file demonstrating the assignment of signal descriptions to target system variables -->
	<SignalDescriptionSet>
		<SignalDescription name="SampleSignal1" id="ID_SIGNAL_SampleSignal1">
			<SegmentSignalDescription>
				<ConstSegment>
					<Duration xsi:type="ConstSymbol">
						<Value>1.0</Value>
					</Duration>
					<Value xsi:type="ConstSymbol">
						<Value>1</Value>
					</Value>
				</ConstSegment>
				<RampSegment>
					<Duration xsi:type="ConstSymbol">
						<Value>3.4</Value>
					</Duration>
					<Start xsi:type="ConstSymbol">
						<Value>1</Value>
					</Start>
					<Stop xsi:type="ConstSymbol">
						<Value>10</Value>
					</Stop>
				</RampSegment>
				<RampSlopeSegment>
					<Duration xsi:type="ConstSymbol">
						<Value>8</Value>
					</Duration>
					<Slope xsi:type="ConstSymbol">
						<Value>1</Value>
					</Slope>
					<Offset xsi:type="ConstSymbol">
						<Value>7.5</Value>
					</Offset>
				</RampSlopeSegment>
				<ExpSegment>
					<Duration xsi:type="ConstSymbol">
						<Value>4</Value>
					</Duration>
					<Start xsi:type="ConstSymbol">
						<Value>1</Value>
					</Start>
					<Stop xsi:type="ConstSymbol">
						<Value>5</Value>
					</Stop>
					<Tau xsi:type="ConstSymbol">
						<Value>0.5</Value>
					</Tau>
				</ExpSegment>
				<SineSegment>
					<Duration xsi:type="ConstSymbol">
						<Value>4</Value>
					</Duration>
					<Amplitude xsi:type="ConstSymbol">
						<Value>3</Value>
					</Amplitude>
					<Period xsi:type="ConstSymbol">
						<Value>2</Value>
					</Period>
					<Phase xsi:type="ConstSymbol">
						<Value>1</Value>
					</Phase>
					<Offset xsi:type="ConstSymbol">
						<Value>-1</Value>
					</Offset>
				</SineSegment>
                            <NoiseSegment>
                                    <Duration xsi:type="ConstSymbol">
                                          <Value>1.0</Value>
                                    </Duration>
                                    <Mean xsi:type="ConstSymbol">
                                          <Value>2.0</Value>
                                    </Mean>
                                    <Seed xsi:type="ConstSymbol">
                                          <Value>3.5</Value>
                                    </Seed>
                                    <Sigma xsi:type="ConstSymbol">
                                          <Value>0.5</Value>
                                    </Sigma>
                            </NoiseSegment>
                            <SawSegment>
                                    <Amplitude xsi:type="ConstSymbol">
                                         <Value>2.0</Value>
                                    </Amplitude>
                                    <Duration xsi:type="ConstSymbol">
                                         <Value>5.0</Value>
                                    </Duration>
                                    <DutyCycle xsi:type="ConstSymbol">
                                         <Value>0.5</Value>
                                    </DutyCycle>
                                    <Offset xsi:type="ConstSymbol">
                                         <Value>-2.0</Value>
                                    </Offset>
                                    <Period xsi:type="ConstSymbol">
                                         <Value>1.0</Value>
                                    </Period>
                                    <Phase xsi:type="ConstSymbol">
                                         <Value>0.25</Value>
                                    </Phase>
                            </SawSegment>
                            <PulseSegment>
                                    <Amplitude xsi:type="ConstSymbol">
                                         <Value>1.0</Value>
                                    </Amplitude>
                                    <Duration xsi:type="ConstSymbol">
                                         <Value>5.0</Value>
                                    </Duration>
                                    <DutyCycle xsi:type="ConstSymbol">
                                         <Value>0.9</Value>
                                    </DutyCycle>
                                    <Offset xsi:type="ConstSymbol">
                                         <Value>-2.0</Value>
                                    </Offset>
                                    <Period xsi:type="ConstSymbol">
                                         <Value>1.0</Value>
                                    </Period>
                                    <Phase xsi:type="ConstSymbol">
                                         <Value>0.25</Value>
                                    </Phase>
                            </PulseSegment>
			</SegmentSignalDescription>
		</SignalDescription>
	</SignalDescriptionSet>
</SignalDescriptionFile>
STIファイルのフォーマットは、XMLスキーマ定義ファイルによって定義されます。すべての信号とセグメントは、対応するXMLタグでシリアル化されます。パフォーマンス上の問題により、SignalValueSegmentの数値はXMLファイルではなく、別のMATLABファイル(.mat)でシリアル化されます。
MAPort - ConditionWatcher の作成と使用
ConditionWatcherは、プロパティConditionで指定された条件がアクティブ化後に真になったときに起動します。条件構文は、プロパティConditionが設定されているときに検証されます。指定された条件が真になると、ConditionWatcherが起動します。ConditionWatcherの条件には、シミュレーションモデルの信号またはパラメータを含めることができます。条件式を短縮するために、シミュレーション変数のエイリアスが使用され、モデルパスにマッピングされます。マッピングは「Defines」プロパティで定義できます。
プログラムが無限にブロックされるのを防ぐには、ConditionWatcherのTimeOutプロパティを設定する必要があります。これにより、ConditionWatcherはTimeOutで指定された時間が経過するとすぐに条件の評価を停止し、イベントを発行します。タイムアウト値が0の場合、ConditionWatcherは直ちにイベントを発行し、指定された条件は無視されます。
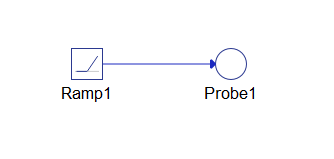
図4に示すモデルと以下のコードは、Condition Watcherの使用例を示しています。この例のモデルは、Ramp(信号発生器)と信号値を監視するためのProbe1で構成されています。
from TyphoonHIL.ASAM.XIL import Server
from TyphoonHIL.ASAM.XIL.Server.MAPort import SampleBreakPoint
from ASAM.XIL.Interfaces.Testbench.MAPort.Enum import BreakpointAction

XML_FILE_NAME = "ModelInfo_HIL.xml"
MA_PORT_CONFIG = os.path.join(TEST_DIR_PATH, "hil_model", XML_FILE_NAME)

# Invoke Testbench
testbench = server.Testbench()

# Create MA Port
ma_port = testbench.MAPortFactory.CreateMAPort('ECU-TEST MA-Port')

# Create configuration file – because we want to use a relative MODEL_FILE_PATH
with open(MA_PORT_CONFIG, 'w') as xml_f:
xml_f.write(xml_content)

# Load configuration
cfg = maPort.LoadConfiguration(str(MA_PORT_CONFIG))

# Apply to the MA Port
maPort.Configure(cfg, False)

# Create WatcherFactory
cond_watch = testbench.WatcherFactory

# Create a C# Dictionary <string, string> object
definesDict = Dictionary[str, str]()

# Define the condition and dictionary entries
condition = "value > 2"
definesDict["value"] = "Probe1"

# Create the instance of Condition Watcher - call the CreateConditionWatcher method
cw_instance = cond_watch.CreateConditionWatcher(condition, definesDict)

# Set the TimeOut of Condition Watcher
cw_instance.TimeOut = 5

# Start the simulation
maPort.StartSimulation()

# Create the instance of MAPortBreakpoint
ma_port_break_point = SampleBreakPoint(cw_instance, BreakpointAction.eNONE)

# Set the Breakpoint property
maPort.Breakpoint = ma_port_break_point

# Get TimeOut attribute
timeout = cw_instance.TimeOut

# Invoke WaitForBreakpoint function
maPort.WaitForBreakpoint(timeout)